BGE-M3 소개
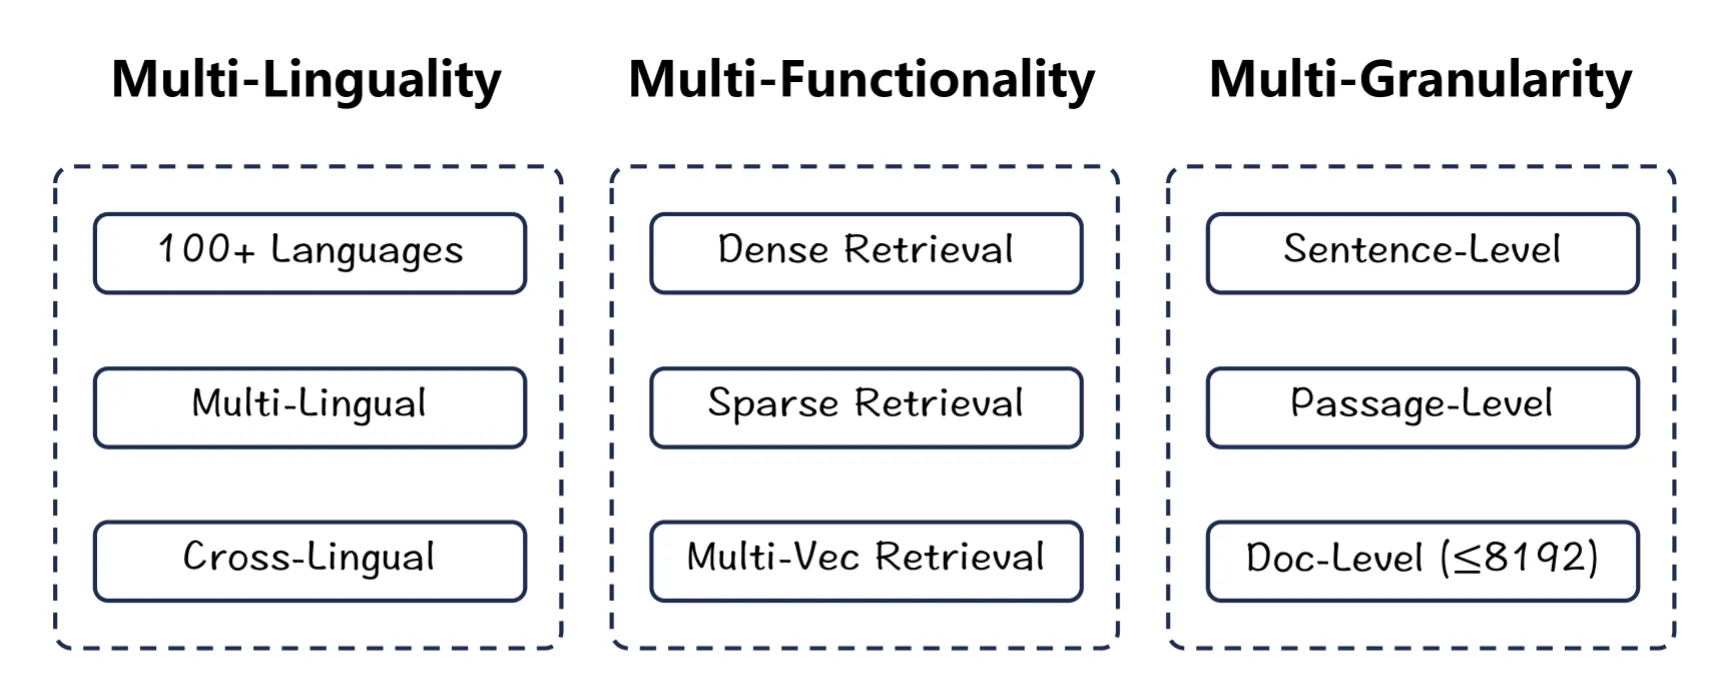
모델의 주요 특징과 성능
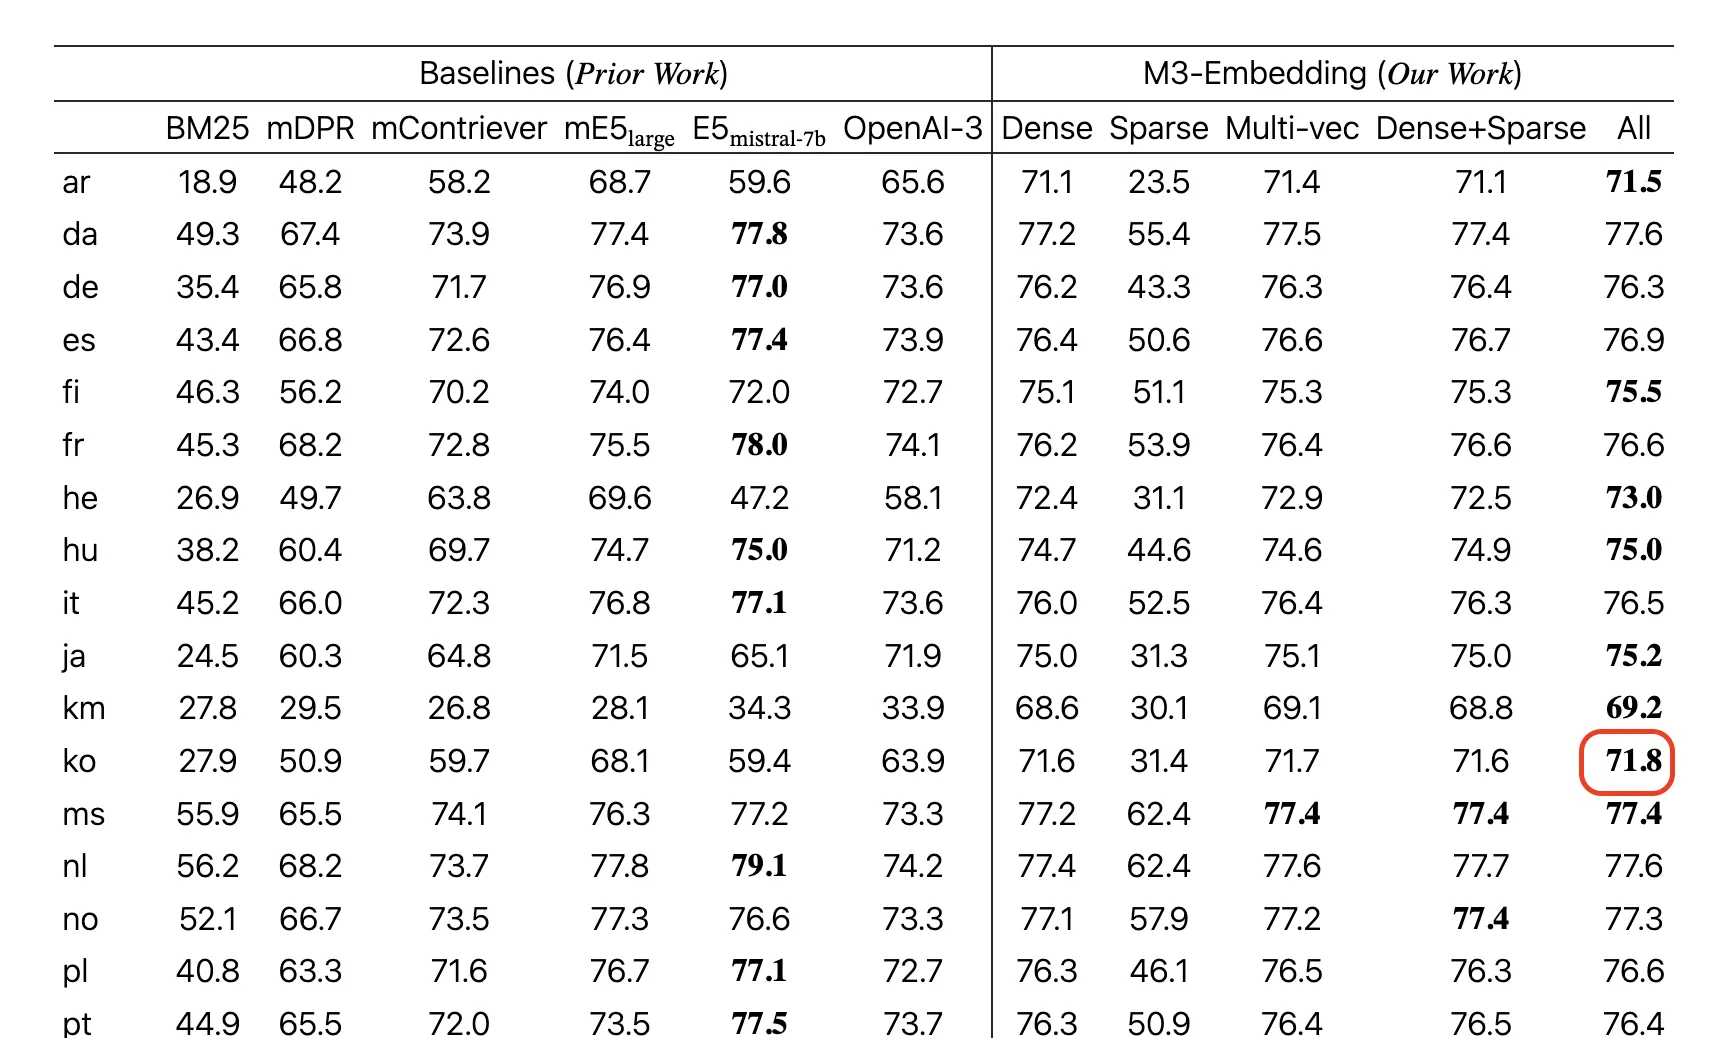
BGE-M3는 70개 이상의 언어를 지원하는 다국어 임베딩 모델입니다. 약 25만 개의 토큰으로 구성된 풍부한 다국어 어휘 사전을 보유하고 있으며, 특히 한국어에서 뛰어난 성능을 보입니다.
MTEB(Massive Text Embedding Benchmark) 한국어 벤치마크에서 기존 다국어 임베딩 모델들과 비교했을 때 최고 수준의 성능을 달성했으며, 특히 검색과 분류 태스크에서 우수한 결과를 보여줍니다. 또한 한국어 단일 언어 임베딩 모델들과 비교해도 경쟁력 있는 성능을 제공하면서도, 다국어 지원이라는 추가적인 이점을 가지고 있습니다.
최근 RAG (Retrieval-Augmented Generation) 등 임베딩 벡터 추출을 통한 통한 벡터 검색 태스크에서 자주 활용되는 모델 중 하나입니다.
3가지 Retrieval 손실 함수 구조
BGE-M3 모델은 다음과 같은 3가지 종류의 Retrieval 손실 함수를 동시에 최적화하는 것이 특징입니다.
1.
Dense Retrieval
•
문장 단위 CLS 벡터를 통한 의미 검색
•
전체 문장의 의미를 단일 벡터로 압축하여 표현
2.
Lexical Retrieval
•
토큰 단위 중요도 가중치를 통한 검색
•
각 토큰의 중요도를 학습하여 키워드 기반 검색 성능 향상
3.
Multi-Vector Retrieval
•
토큰 단위의 벡터를 통한 검색
•
각 토큰별 독립적인 벡터 표현을 통해 세밀한 의미 매칭 가능
원본 모델 구현의 손실 함수 ( loss function )
Roberta XL 기반 구조
모델 구조의 기반이 되는 XLMRobertaModel ( link ) 는 이미 충분히 검증된 클래식한 구조이기 때문에 학습 관련 테크닉을 제외하면 추론의 모델 구조는 매우 단순하고 명확합니다. 예를들어 최신 Transformer 모델에서 흔히 볼 수 있는 다음과 같은 기법들은 적용되지 않았습니다.
•
Rotary Position Embedding (RoPE)
•
Pre Normalization
•
Linear bias 제거
huggingface - transformers 라이브러리를 통하여 BGE-M3 모델 구조를 출력해보는법
이처럼 총 9개의 기본적인 선형 Layer (Dense, Linear, MLP)와 3개의 LayerNormalization 만으로 모델의 추론 구조를 거의 완벽하게 구현할 수 있습니다.
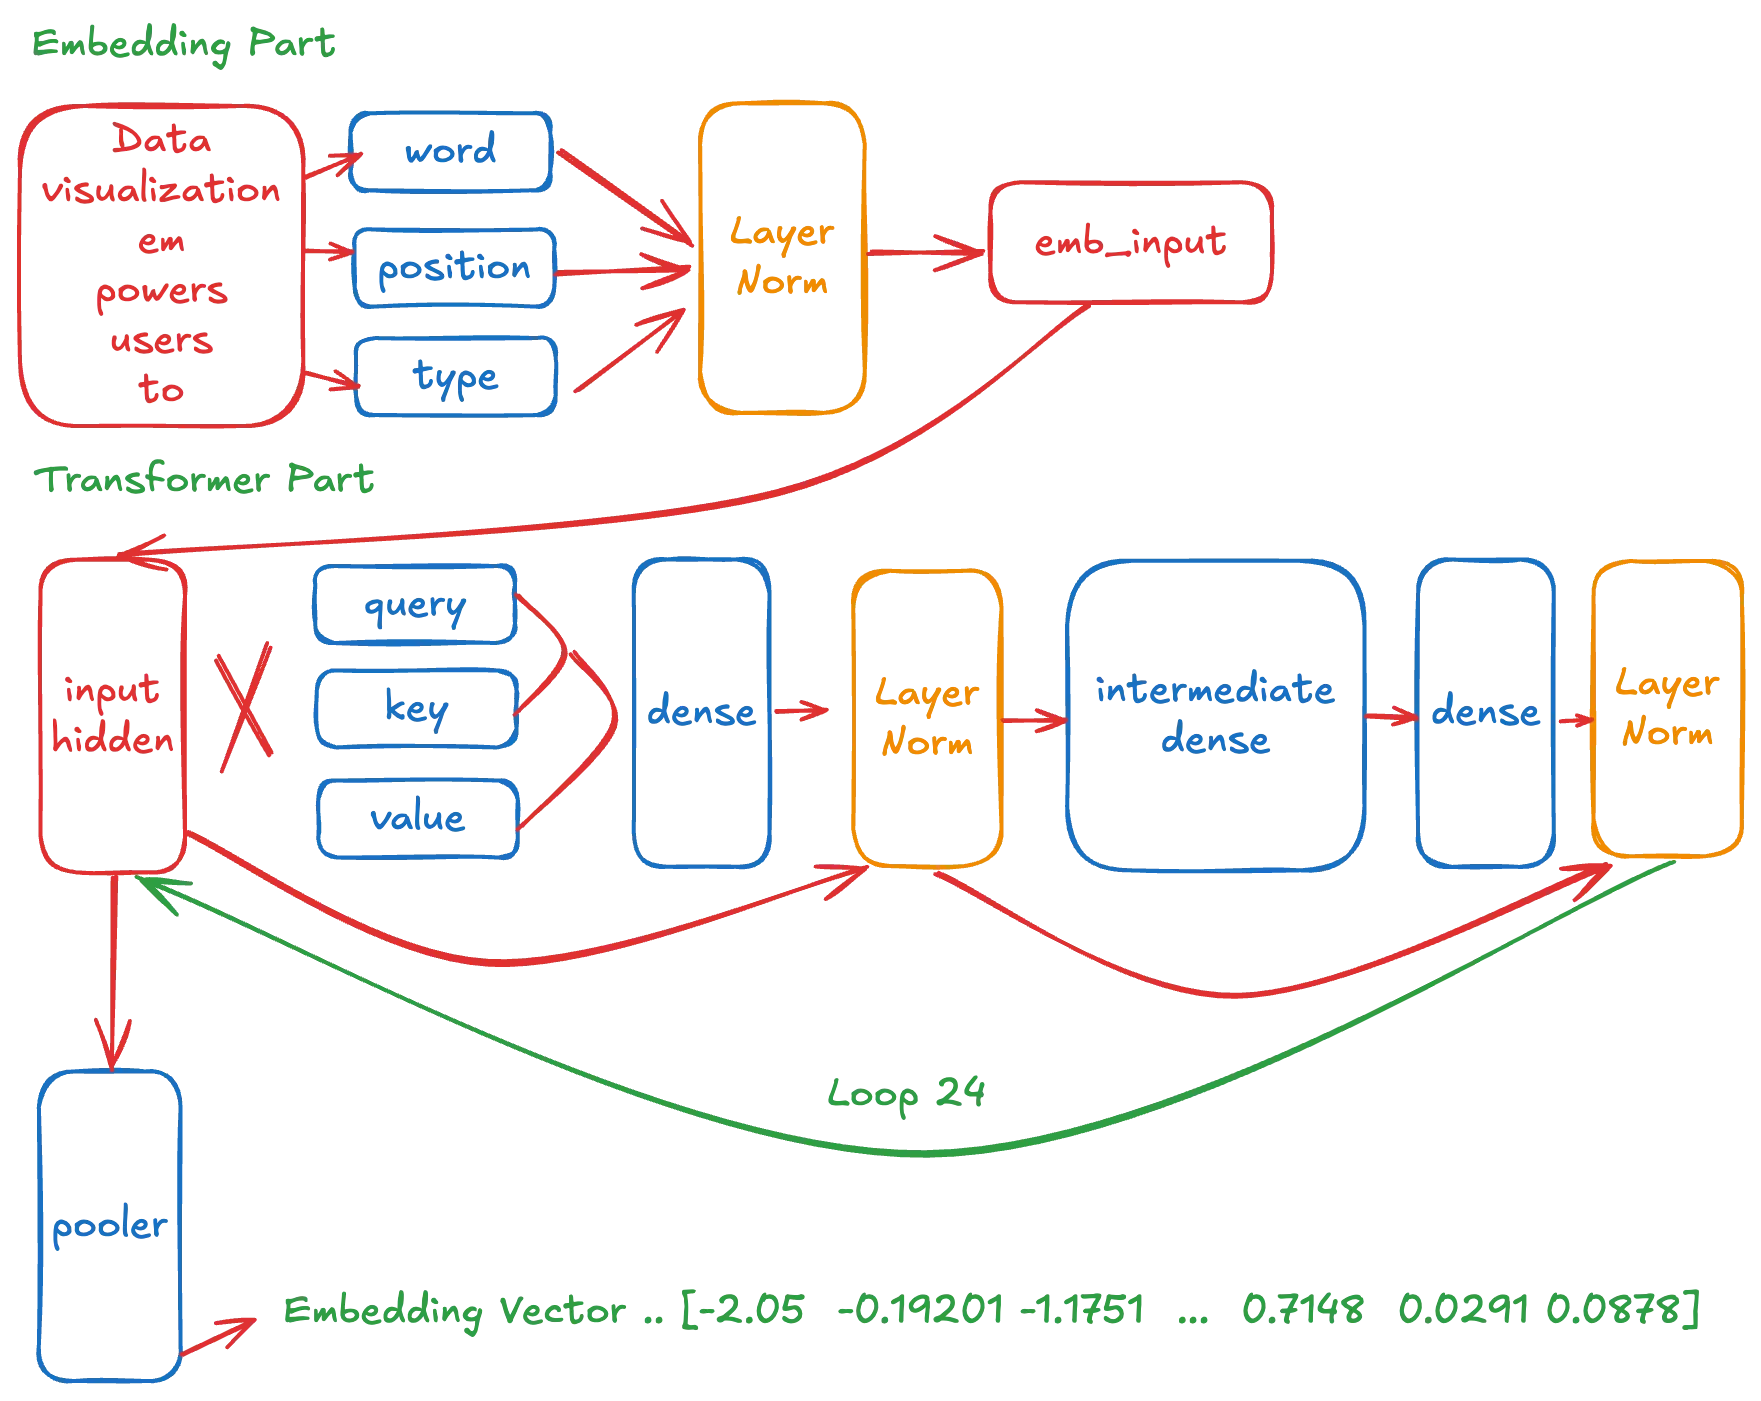
그림 1 BGE-M3 모델의 도식도
Transformer 블록이 24번 반복되는 구조이므로, 실질적으로는 다음의 핵심 레이어들만 구현하면 됩니다.
•
임베딩 관련 3개 레이어
•
Transformer 블록 내부의 9개 레이어
•
LayerNormalization 3개 레이어
이러한 기본 구성요소들과 그들 간의 연산 관계만 정의하면 BGE-M3 모델의 추론 구조를 구현할 수 있습니다.
TensorFlow - Keras 구현
배포 패키징의 용이성과 가장 쉬운 추상화 인터페이스를 제공하는 Keras 구현체를 예시로 소개합니다.
BGE-M3 모델 구현
먼저 기본 모델 클래스를 정의합니다.
class BGEM3TensorFlow(tf.keras.Model):
Scala
복사
임베딩 레이어 구현
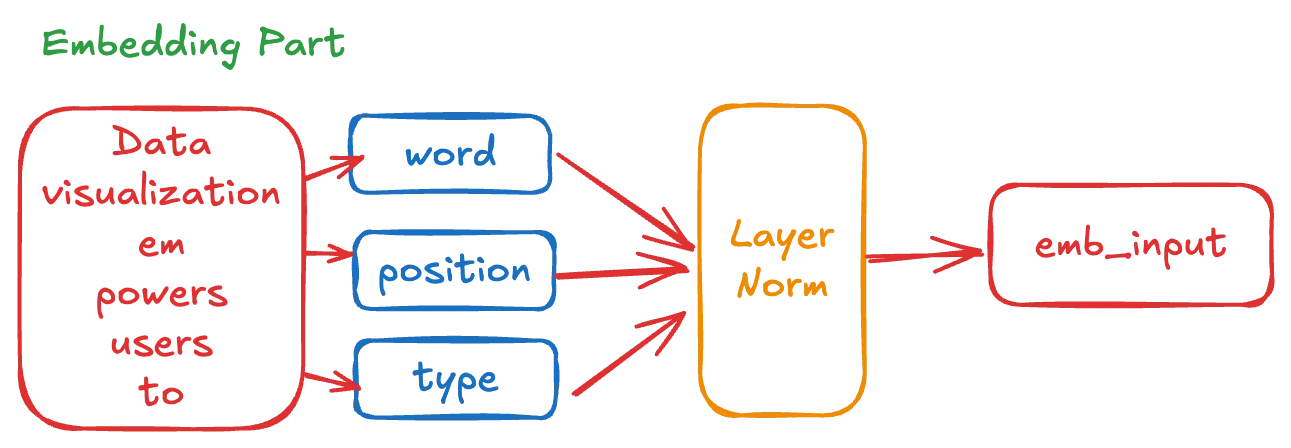
임베딩 레이어는 자연어를 모델이 이해할 수 있는 숫자 벡터로 변환하는 핵심 컴포넌트입니다. BGE-M3는 세 가지 타입의 임베딩을 사용합니다.
1.
Word Embedding
•
어휘 크기: 250,002 토큰
•
각 토큰당 1,024차원의 벡터 표현
•
예시: 토큰 ID가 0인 단어는 임베딩 테이블의 0번째 행(1,024차원)으로 매핑
•
토큰 ID가 5000인 단어는 5000번째 행의 벡터로 매핑
2.
Position Embedding
•
크기: 8,194 위치 (8,192 + 2)
•
각 위치당 1,024차원의 벡터 표현
•
시퀀스 내 토큰의 위치 정보를 인코딩
3.
Token Type Embedding
•
BGE-M3에서는 단일 타입만 사용
•
1,024차원의 고정된 벡터가 모든 토큰에 동일하게 적용
•
성능 최적화를 위해 상수로 캐싱 가능
위의 설명대로 임베딩 레이어들을 구현하면 다음과 같습니다.
def __init__(self,...):
# Word embeddings
self.word_embedding = tf.keras.layers.Embedding(
input_dim=250002,
output_dim=1024,
)
# Position embeddings
self.position_embedding = tf.keras.layers.Embedding(
input_dim=8194,
output_dim=1024,
)
# Token type embeddings
self.token_type_embedding = tf.keras.layers.Embedding(
input_dim=1,
output_dim=1024,
)
# Layer normalization and dropout
self.layer_norm = tf.keras.layers.LayerNormalization(epsilon=1e-5)
#self.dropout = layers.Dropout(rate=0.1)
Python
복사
이러한 임베딩 구조는 모델의 입력부에서 텍스트를 효과적으로 수치화하여 후속 Transformer 레이어들이 처리할 수 있는 형태로 변환합니다. 그중 token_type_embeddings의 경우 단일 값만 사용 하므로, 추론 시 성능 최적화를 위해 미리 계산된 상수 벡터로 대체할 수 있습니다.
그림 2 Embedding Part
tf.gather 를 사용하여 단어 토큰의 숫자의 순서열을 임베딩의 텐서로 변환합니다.
그리고 layerNorm 레이어를 통과시켜 정규화 합니다.
def call(self, ..)
self.inputs_embeds = tf.gather(params=self.weight, indices=input_ids)
self.position_embeds = tf.gather(params=self.position_embeddings, indices=position_ids)
self.token_type_embeds = tf.gather(params=self.token_type_embeddings, indices=token_type_ids)
embedding_output = inputs_embeds + position_embeds + token_type_embeds
embedding_output = self.layerNorm(embedding_output)
Python
복사
추가적인 정보
이러한 구현으로 모델의 기초적인 임베딩 부분이 완성되었으며, 전체 모델 구조의 약 20% 가량이 구현된 것으로 볼 수 있습니다.
다음 단계로는 모델의 핵심 부분인 Transformer Block의 구현이 필요합니다.
Transformer Block 구조
그림 3 Transformer Block Part
각 Transformer Block은 크게 다음과 같은 주요 컴포넌트들로 구성됩니다.
•
6개의 Dense 레이어
•
2개의 LayerNormalization 레이어
•
2번의 Residual 연산
먼저 기본 클래스를 정의합니다.
class TransformerBlock(tf.keras.layers.Layer):
Scala
복사
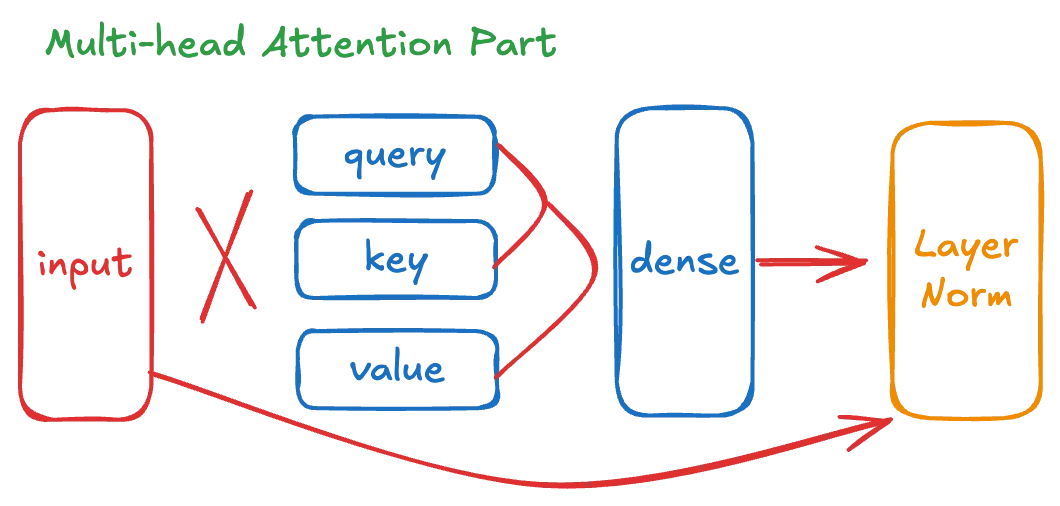
위에서 확인한 원본 모델의 가중치 구조를 보면 Attention Part는 다음과 같은 컴포넌트들이 필요합니다.
그림 3-1 Transformer Attention Part
1.
Multi-Head Self-Attention 컴포넌트
# Query, Key, Value 가중치
encoder.layer.0.attention.self.query | shape: torch.Size([1024, 1024])
encoder.layer.0.attention.self.key | shape: torch.Size([1024, 1024])
encoder.layer.0.attention.self.value| shape: torch.Size([1024, 1024])
# Attention 출력 처리
encoder.layer.0.attention.output.dense | shape: torch.Size([1024, 1024])
encoder.layer.0.attention.output.LayerNorm | shape: torch.Size([1024])
Markdown
복사
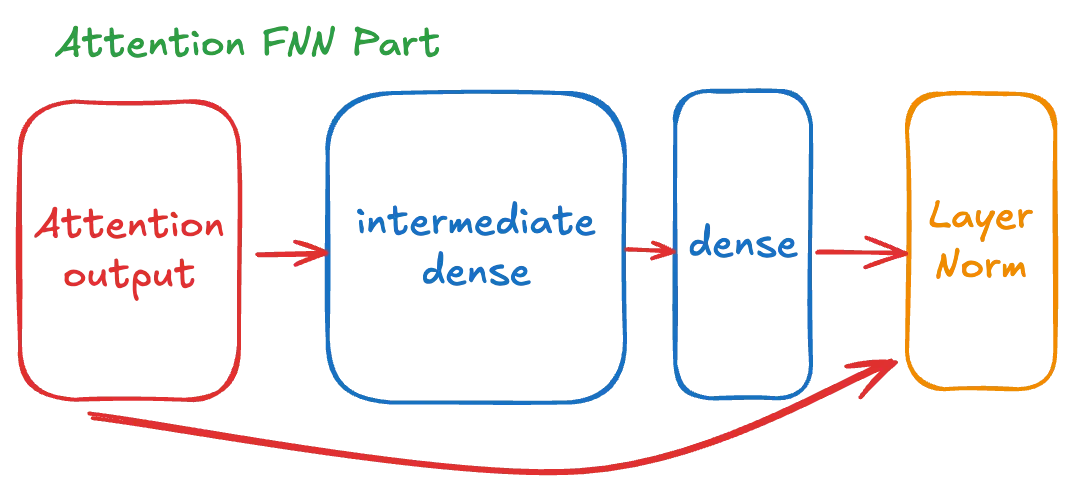
2.
Attention - FNN 컴포넌트
# 중간 레이어
encoder.layer.0.intermediate.dense | shape: torch.Size([4096, 1024]) # 확장
encoder.layer.0.output.dense | shape: torch.Size([1024, 4096]) # 축소
# 최종 정규화
encoder.layer.0.output.LayerNorm | shape: torch.Size([1024])
Markdown
복사
Keras의 기본 Multi-head Attention 의 경우 3D Attention을 기본으로 하고있고 구현상의 약간의 차이점이 존재 합니다. huggingface 공식 구현체의 구조를 참고하여 Multi-head Attention을 커스텀 구현하겠습니다.
def __init__(self, ...):
self.wq = tf.keras.layers.Dense(1024)
self.wk = tf.keras.layers.Dense(1024)
self.wv = tf.keras.layers.Dense(1024)
self.dense = tf.keras.layers.Dense(1024)
self.attlayerNorm = tf.keras.layers.LayerNormalization(epsilon=1e-5)
self.intermediate = tf.keras.layers.Dense(4096)
self.output_dense = tf.keras.layers.Dense(1024)
self.output_norm = tf.keras.layers.LayerNormalization(epsilon=1e-5)
Scala
복사
이 구현에서는 학습시에만 사용되는 Dropout 레이어는 생략할 수 있습니다. 다음 섹션에서는 이러한 레이어들을 연결하여 실제 Transformer Block의 동작을 구현하는 방법을 다루겠습니다.
Multi-Head Attention 구현
def call(self, ..)
inputs = embedding_output
# Query, Key, Value를 계산
q = self.wq(inputs) # (batch_size, seq_len, d_model)
k = self.wk(inputs) # (batch_size, seq_len, d_model)
v = self.wv(inputs) # (batch_size, seq_len, d_model)
# 다중 헤드로 분리
q = self.split_heads(q, batch_size, 16, 64) # (batch_size, num_heads, seq_len_q, depth)
k = self.split_heads(k, batch_size, 16, 64) # (batch_size, num_heads, seq_len_k, depth)
v = self.split_heads(v, batch_size, 16, 64) # (batch_size, num_heads, seq_len_v, depth)
def split_heads(self, x, batch_size, num_heads, depth):
x = tf.reshape(x, (batch_size, -1, num_heads, depth))
return tf.transpose(x, perm=[0, 2, 1, 3]) # (batch_size, num_heads, seq_len, depth)
Python
복사
위 모델 구조에서 정의한 3개의 dense 레이어를 통해서 q v k 를 계산합니다.
split_heads라는 간단한 연산을 통해서 정의된 멀티헤드 숫자로 분리하게 됩니다.
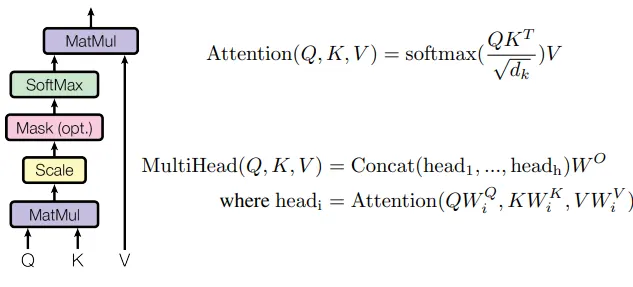
XLM Roberta 모델이 사용하는 Scaled Dot-Product Attention을 적용 합니다.
이는 해당 모델의 규모로 계산된 dk 수치인 8.0으로 attention_scores 을 나눠주게 됩니다.
이후 어텐션 마스크를 적용하고 의미 있는 토큰이 위치한 자리는 1이 더해지고 의미가 적은 자리는 -10000이 더해집니다. 이후 softmax 연산을 통해서 -10000 이 더해진 위치의 Attention 점수는 거의 0으로 수렴하게 됩니다.
이후 다시 v를 곱해 최종 Attention 결과를 얻습니다.
# Scaled Dot-Product Attention Score
dk = tf.cast(math.sqrt(1024 // 16), tf.float32)
attention_scores = tf.matmul(q, k, transpose_b=True) # (batch_size, num_heads, seq_len_q, seq_len_k)
attention_scores = tf.divide(attention_scores, dk)
# Attention mask
attention_scores = tf.add(attention_scores, mask)
attention_probs = tf.nn.softmax(attention_scores + 1e-9, axis=-1)
# Attention 결과 계산
attention_output = tf.matmul(attention_probs, v) # (batch_size, num_heads, seq_len_q, depth)
attention_output = tf.transpose(attention_output,
perm=[0, 2, 1, 3]) # (batch_size, seq_len_q, num_heads, depth)
attention_output = tf.reshape(attention_output,
(batch_size, -1, self.d_model)) # (batch_size, seq_len_q, d_model)
# Attention 최종 Dense Layer를 통과
attention_output = self.dense(attention_output) # (batch_size, seq_len_q, d_model)
# 첫번째 Residual 연산
attention_output = self.attlayerNorm(inputs=attention_output + inputs)
Python
복사
dense 레이어를 통과하여 최종 출력값을 얻고 최초 input인 임베딩값 혹은 이전 레이어 블럭의 히든 값을 더하여 첫번째 Residual을 적용하고 하고 정규화 합니다.
Transformer Feed-Forward Neural Network (FFNN) 구현
Transformer Block의 두 번째 주요 컴포넌트인 Feed-Forward Neural Network 부분을 설명하겠습니다:
그림 3-2 TransformerBlock FNN (FeedForward Neural Network) Part
# intermediate layer
intermediate_output = self.intermediate(attention_output)
intermediate_output = self.gelu_approx(intermediate_output) # Use exact GELU approximation
layer_output = self.output_dense(intermediate_output)
layer_output = self.output_dropout(layer_output, training=training)
# 두번째 Residual 연산
output = layer_output + attention_output
output = self.output_norm(output)
# GELU Approximation
def gelu_approx(self, x):
x = tf.convert_to_tensor(x)
cdf = 0.5 * (1.0 + tf.math.erf(x / tf.cast(tf.sqrt(2.0), x.dtype)))
return x * cdf
Python
복사
기본 출력층의 hidden 값의 차원의 4배의 크기를 가지는 intermediate dense 레이어를 통과시키고 이전 attention_output 과 합하여 두번째 Residual 처리하고 정규화 합니다
BGE-M3 모델은 기본적으로 위 구조를 24번 반복합니다.
encoder_layers = []
for i in range(self.num_layers):
layer = TransformerBlock(
d_model=1024,
num_heads=16,
intermediate_size=4096,
name=f"encoder.layer.{i}"
)
encoder_layers.append(layer)
Python
복사
BGE-M3 에서는 pooler 레이어를 명시적으로 Skip 하기 때문에 아래 구현은 단순히 더미로 둘 수 있습니다.
pooler.dense.weight | shape: torch.Size([1024, 1024])
pooler.dense.bias | shape: torch.Size([1024])
Scala
복사
모델 Forward flow 정리
Token 임베딩 과정
def call(self, input_ids, ..)
inputs_embeds = tf.gather(params=self.weight, indices=input_ids)
input_shape = shape_list(inputs_embeds)[:-1]
position_ids = self.create_position_ids_from_input_ids(input_ids=input_ids))
position_embeds = tf.gather(params=self.position_embeddings, indices=position_ids)
token_type_ids = tf.fill(dims=input_shape, value=0)
token_type_embeds = tf.gather(params=self.token_type_embeddings, indices=token_type_ids)
embedding_output = inputs_embeds + position_embeds + token_type_embeds
embedding_output = self.layerNorm(embedding_output)
def create_position_ids_from_input_ids(self, input_ids, past_key_values_length=0, padding_idx=1):
mask = tf.cast(tf.math.not_equal(input_ids, padding_idx), dtype=input_ids.dtype)
incremental_indices = (tf.math.cumsum(mask, axis=1) + past_key_values_length) * mask
return incremental_indices + padding_idx
Python
복사
•
position_ids 는 공식 구현체를 참고하여 create_position_ids_from_input_ids 를 통해 생성합니다.
•
token_type_ids 는 모두 0으로 채웁니다.
•
tf.gather를 사용하여 토큰 인덱스의 순서열을 해당 위치의 임베딩 텐서로 변환합니다.
•
3가지 임베딩을 모두 더하고 layerNorm 레이어를 통화시켜 정규화 합니다.
shape_list 함수 형태
Transformer Block 에 주입할 Attention Mask 를 가공합니다.
attention_mask_shape = shape_list(attention_mask)
extended_attention_mask = tf.reshape(
attention_mask, (attention_mask_shape[0], 1, 1, attention_mask_shape[1])
)
Python
복사
•
기존 attention_mask를 (batch_size, 1, 1, sequence_length) 형태로 reshape합니다.
•
이는 멀티헤드 Attention에서 Broadcasting을 위한 준비 과정입니다.
shape_list 함수 형태
extended_attention_mask = tf.cast(extended_attention_mask, dtype=embedding_output.dtype)
one_cst = tf.constant(1.0, dtype=embedding_output.dtype)
ten_thousand_cst = tf.constant(-10000.0, dtype=embedding_output.dtype)
Python
복사
•
마스크를 임베딩과 같은 데이터 타입으로 명시적으로 변환합니다.
•
1.0과 -10000.0의 상수를 정의합니다.
extended_attention_mask = tf.multiply(tf.subtract(one_cst, extended_attention_mask), ten_thousand_cst)
Python
복사
•
(1 - mask) * -10000 연산을 수행합니다.
•
원래 마스크에서 1은 실제 토큰을, 0은 패딩을 나타냅니다.
•
이 연산 후에는:
◦
실제 토큰 위치(원래 1) → 0
◦
패딩 위치(원래 0) → -10000
•
이렇게 처리하여 Softmax 연산시 패딩 위치의 Attention 점수를 0에 가까워지게 만듭니다.
아래 연산을 통해서 24번의 transformer block을 통과시킨 마지막 hidden_state 를 출력합니다.
# embedding_output = inputs_embeds + position_embeds + token_type_embeds
hidden_states = embedding_output
# Pass through encoder layers
for layer in self.encoder_layers:
hidden_states = layer(
hidden_states,
attention_mask=attention_mask,
)
Python
복사
BGE-M3의 기본 벡터 출력은 최종 hidden 배치당 가장 첫번째 벡터만을 사용하며 이는 CLS 토큰입니다.
pooled_output = hidden_states[:, 0, :] # (batch, seq_len, hidden_dim)
Python
복사
BGE-M3의 멀티 벡터 출력은 별도의 레이어 하나를 더 통과 시켜야 합니다.
기본 huggingface 의 공식 XLMRobertaModel 에서는 지원하지 않기 때문에 별도의 가중치를 로딩하여 연산 하여야 합니다.
모델의 구조와 출력값은 아래와 같이 정의 할 수 있습니다.
self.colbert_linear = tf.keras.layers.Dense(
units=self.d_model,
)
colbert_vecs = self.colbert_linear(hidden_states[:, 1:])
colbert_vecs = colbert_vecs * tf.cast(attention_mask_origin[:, 1:][:, :, None], dtype=tf.float32)
Python
복사
원본 모델의 분리된 추가 가중치는 다음과 같이 적용할 수 있습니다.
기본적으로 제공되는 추가 가중치가 pytorch 형식이기 때문에 다음과 같이 torch 를 통하여 읽어야 합니다.
model_path = "./bge-m3/colbert_linear.pt"
colbert_model = torch.load(model_path, map_location=device, weights_only=True)
colbert_weights = colbert_model['weight']
colbert_bias = colbert_model['bias']
tf_model.colbert_linear.set_weights([
colbert_weights.numpy().T,
colbert_bias.numpy()
])
Python
복사
아래와 같이 모델의 최종 임베딩 벡터 출력값을 만들 수 있습니다.
outputs = {
"dense_vecs": pooled_output, #[batch, hidden_size]
"colbert_vecs" : colbert_vecs, #[hidden, seq_len, hidden_size]
}
return outputs
Python
복사
모델 Signature 생성 및 패키징 및 저장
추가적으로 다음과 같은 코드로 최종으로 모델을 저장하고 패키징 할 수 있습니다.
def save_model_with_tokenizer(model, tokenizer, save_path):
"""Save both model and tokenizer"""
os.makedirs(save_path, exist_ok=True)
model_save_path = os.path.join(save_path, 'model')
# Ensure model is built by calling it with dummy inputs
dummy_inputs = {
'input_ids': tf.zeros((2, 11), dtype=tf.int32),
'attention_mask': tf.ones((2, 11), dtype=tf.int32)
}
_ = model(dummy_inputs, training=False, output_hidden_states=True)
# Define serving signature
@tf.function(input_signature=[
tf.TensorSpec(shape=[None, None], dtype=tf.int32, name='input_ids'),
tf.TensorSpec(shape=[None, None], dtype=tf.int32, name='attention_mask')
])
def serving_fn(input_ids, attention_mask):
inputs = {
'input_ids': input_ids,
'attention_mask': attention_mask
}
outputs = model(inputs=inputs, training=False)
return {
'dense_vecs': outputs['dense_vecs']
'colbert_vecs': outputs['colbert_vecs']
}
# Save model
tf.saved_model.save(
model,
model_save_path,
signatures={'serving_default': serving_fn}
)
# Save tokenizer
tokenizer.save_pretrained(save_path)
return model_save_path
Python
복사
위와 같은 구현과 내용을 통해서 거의 모든 플랫폼과, 웹, 모바일 배포 가능한 모델 구조의 코드 베이스를 확보 할 수 있습니다.
활용 예시
tensorflow-java-scala 를 이용한 대규모 hadoop-spark 작업
kotlin-springboot 를 이용한 연합 학습과 추론 개인화 RAG 서비스
tensorflow-lite 를 이용한 모바일, 임베디드 추론
tensorflow-metal 을 이용한 Apple npu-gpu 수준에서의 추론 및 커스텀 구현
부록
모델 및 가중치 변환 코드 예시
변환 모델 검증 결과
전체 예제 코드


